Udemy 上面的 Alex Dev 的课程 Basics of C# and Unity for Complete Beginners – Part 1
现在是 2025 年的 7 月中旬,我发现这门课在 Udemy 上已经下架了,不过之前订阅的还可以看,虽然看不了视频了,但个人觉得这门课还是非常有价值的,故依旧选择看完并将笔记上传。【还有个 Part 2 不知道去哪看了 🙁 】
本篇文章的仓库,你也可以在仓库中查看本文:
- GitHub:TobyKSKGD/Udemy-course—Onion-Lad: Udemy 上面的 Alex Dev 课程 Basics of C# and Unity for Complete Beginners – Part 1 的仓库与笔记
- Gitee:Udemy course – Onion Lad: Udemy 上面的 Alex Dev 课程 Basics of C# and Unity for Complete Beginners – Part 1 的仓库与笔记
Section 1: BEFORE YOU START
一些课程相关的说明与介绍,无知识要点。
Section 2: First steps
Tools 工具栏:

- 简单快捷键(按工具栏的位置顺序排序)
Q:视图工具(View Tool)W:移动工具(Move Tool)E:旋转工具(Rotate Tool)R:缩放工具(Scale Tool)T:矩形工具(Rect Tool)Y:变形工具(Transform Tool)
Hierarchy 中可以创建简单的图形右键选择 2D Object 可以看到相关图形。
选中图形在 Inspector 可以修改图形的相关属性。简单的如:位置(Position)、旋转(Rotation)、规模(Scale)、颜色(Color)等。Transform 中的图像相关参数调整可以通过将鼠标放在 X、Y、Z 轴字母上面然后左右滑动来快速调整。
图像中的 Add Component 可以给图形添加额外的属性。比如这里涉及到的几个:Rigidbody 2D(类似于给物体加上一个向下的重力,如果从中没有碰到实体将会一直往下掉落)、Circle Collider 2D(2D 圆形的碰撞体:赋予图形可交互的实体)、Box Collider 2D(2D 矩形的碰撞体)。
- Rigidbody 2D 中的一些属性:
Gravity Scale:1默认有一个向下的重力(可以通过改变 Gravity Scale 来修改下落速度);0在被其它物体碰撞之前不会受重力影响。Constraints:其中有Freeze Position和Freeze Rotation冻结不同坐标作用,实在来说比如勾选 Freeze Position 中的 X 和 Y 此时如果一个碰撞体从左右任何一遍下落(Gravity Scale 的属性需要是 0),将会是该图形旋转。【Maybe we can play with physics!】Body Type:物体的状态。默认为Dynamic;若将其改为Static那么这个物体将静止不变,无论是否对它应用 Physics,或者通过 Transform 改变位置;另外还有一种状态为Kinematic,此时物体不会受物理影响(重力、碰撞等),但是可以通过代码等方式改变其位置或移动速度。
在 Project 中的 Assets 右键可以添加一些东西。右键 -> Create -> 2D -> Physics Material 2D,如此可以添加一个 2D 的物理材料在 Assets 中方便后续的批量使用。Physics Material 2D 中有两个属性:Friction 和 Bounciness 分别为摩擦力和弹力。将编辑好的 Physics Material 2D 拖动到如 Rigidbody 2D 中的 Material 属性中可以给该物品添上此材料所拥有的属性。
Section 3:Character
First script, input and movement
在物体的 Add Component 的 New script 中可以给物体添加脚本。属性中双击打开脚本(Unity 的偏好设置中选择 Visual Studio)。
虽然创建的脚本与物体的相关属性在同一个位置,但是脚本无权直接访问与控制这些属性。而一般的做法是创建一个变量。
创建一个 Rigidbody 2D 的变量:
public Rigidbody2D rb;此时查看这个脚本所属的物体属性,可以发现在脚本中多了一个叫 Rb 的属性(简单的说如果是 public 那么将在属性中可见并且可以被其它脚本访问,private 那么将在属性中不可见且不可被访问。所以更具该变量是否需要公开而决定 public 或是 private,通常来说,为了防止我们不小心胡乱修改一些地方的代码而改动了其它地方的变量,通常将会把一般的变量设置为 private。当然,如果想让 private 的变量出现在 Unity 的编辑器属性中,可以在 private 前面加上 [SerializeField])。
此时 Rb 的内容为 None,此时将物体的 Rigidbody 2D 属性拖动到这个 Rb 的属性内容中,将可以快速实现 Rigidbody 2D 相关属性的访问(给变量 Rb 附上 Rigidbody 2D 类)。如果用代码实现这一操作就是,在 Start() 函数中写上一句 rb = GetComponent<Rigidbody2D>();,当 Rb 被设置成 private 在编辑器中不可见的情况下可以使用。
当你创建脚本时,脚本里将会自动生成两个函数 Start() 和 Update(),它们之间的区别就是:Start() 函数只有游戏启动时会被调用一次;而 Update() 函数将会在游戏的过程中的每一帧都被调用一次(所以当游戏为 60 fps 时,Update 函数会被调用 60 次)。
还有一种固定时间调用一次的函数 FixedUpdate(),可以在 Unity 的 Edit 中的 Project Settings 里面的 Time 中的 Fixed Timestep 中修改调用的时间间隔。【举个例子:在游戏辐射76中,电脑配置更高的玩家其刷新率就越高,导致其行动速度比电脑配置低的人慢。那解决这个问题的方式就是在 FixedUpdate 函数中调用移动相关的函数。】
using System.Collections;
using System.Collections.Generic;
using UnityEngine;
public class MoveController : MonoBehaviour
{
private Rigidbody2D rb;
[SerializeField] private float moveSpeed;
private float xInput;
// Start is called before the first frame update
void Start()
{
rb = GetComponent<Rigidbody2D>();
}
// Update is called once per frame
void Update()
{
xInput = Input.GetAxis("Horizontal");
rb.velocity = new Vector2(xInput * moveSpeed, rb.velocity.y);
}
}
以上便是一个可以左右移动的脚本。简单说明:
Input.GetAxis("Horizontal");:调用Input中的GetAxis()函数,"Horizontal"可以识别水平方向上的输入(A 或 ← 为向左,D 或 → 为向右)。rb.velocity = new Vector2(xInput * moveSpeed, rb.velocity.y);:Rigidbody2D类中有各种属性变量可以使用,比如这里调用的velocity向量。实例化一个Vector2类可以让其有向量的属性,这个Vector2类是 Unity 官方已经写好的,这里暂时没有说明,具体的可以查询官方文档。xInput:控制物体的方向。moveSpeed:控制物体的移动速度。
Jump of a character
接下来为了方便说明,仅留下一个矩形作为平台,重命名为 Platform,和另外一个矩形作为玩家,重命名为 Player。
可以使用函数 Debug.log() 来进行调试,在 Unity 的终端中会显示 log 的日志内容。
终端的打开方式:Window -> General -> Console。
if (Input.GetKeyDown(KeyCode.Space))
        {
            Debug.Log("Space was pressed");
        }
以上代码简述:
函数 Input.GetKeyDown() 可以检测按下键盘的按键,KeyCode.Space 值表示按下的是空格间。如此该代码的意思就是当按下空格键的时候就在日志中输出语句 Space was pressed。
GetKey 的衍生说明:
在脚本中写入如下代码,然后在 Unity 中按空格调试,看发生的结果。
if (Input.GetKeyDown(KeyCode.Space))
{
Debug.Log("Space was pressed");
}
if (Input.GetKey(KeyCode.Space))
{
Debug.Log("Space is pressed");
}
if (Input.GetKeyUp(KeyCode.Space))
{
Debug.Log("Space was released");
}经过调试对比,发现 GetKey() 函数是只要该按键正在被按时会重复调用此函数,也就是如果一直按着按键,这个函数就会一直被调用;GetKeyDown() 当该键被按时调用一次该函数;GetKeyUp() 当该键被松开时调用一次该函数。
所以参考前面角色移动的实现方式,可以照着写角色跳跃功能:
先定义一个跳跃能力(跳跃高度)以方便之后游戏中可能的修改。
[SerializeField] private float jumpForce;然后使用 GetKeyDown() 函数,在按下空格时,使用 Vector2 进行跳跃的实现。
if (Input.GetKeyDown(KeyCode.Space))
        {
            rb.velocity = new Vector2(rb.velocity.x, jumpForce);
}说明:Vector2 中,我们会在需要动作的那个坐标上进行特殊的说明,例如这个跳跃功能里,角色在跳的时候 x 轴上的坐标是不变的,所以写入 rb.velocity.x 来表示维持前一时刻的状态,注意这里 x 轴上最好不要写 0(Vector2(0, jumpForce)),这个的意思是到0的值上,而不是不改变任何前一状态上的速度等状态。
在实现了移动和跳跃功能后,为了使代码更加简洁,可以将写的跳跃和移动封装成函数,这样在 Start() 函数和 Update() 函数中的内容就会更易读。在 Visual Studio 中,可以选择要封装的语句,然后右键选择快速操作或重构… 或按 Ctrl + . ,然后选择提取方法(或按 Alt + Enter),再给方法命名,最后按 Enter 即可快速构建方法。如下角色的操作代码就会更简洁易懂:
using System.Collections;
using System.Collections.Generic;
using UnityEngine;
public class MoveController : MonoBehaviour
{
private Rigidbody2D rb;
[SerializeField] private float moveSpeed;
[SerializeField] private float jumpForce;
private float xInput;
// Start is called before the first frame update
void Start()
{
rb = GetComponent<Rigidbody2D>();
jumpForce = 4;
}
// Update is called once per frame
void Update()
{
xInput = Input.GetAxis("Horizontal");
Movement();
if (Input.GetKeyDown(KeyCode.Space))
{
Jump();
}
}
private void Movement()
{
rb.velocity = new Vector2(xInput * moveSpeed, rb.velocity.y);
}
private void Jump()
{
rb.velocity = new Vector2(rb.velocity.x, jumpForce);
}
}
Collision detection
按照以上方法简单实现了角色跳跃的功能,但是调式的时候会发现,只要玩家一直按空格键,角色就会不断跳跃。因此需要给角色加上跳跃的限制,让角色每次只能跳一下。解决这个问题的思路是碰撞体检测。
首先,我们给平台的层命一个名,在之前创建的 platform 中的 Layer 中展开选择 Add Layer…,在 Layer 3 中键入 Ground 对平台层命名。
然后回到脚本中,定义一个地面检测半径:
public float groundCheckRadius;接着再定义一个新的方法 OnDrawGizmos(),这个方法其实在 Unity 中是有的,但是默认为空,可以供设计者自行定义,这个时候鼠标放在 OnDrawGizmos 上面,可以看到提示,Unity: 如果你想要绘制可选取并始终绘制的 gizmos,请实现此 OnDrawGizmos。于是在方法中我们调用 Gizmos 类中的 DrawWireSphere() 方法,如果此时也将鼠标放在 DrawWireSphere 上,可以看到此方法的解释:大概意思就是绘制一个输入的中心和半径的线框球体(圆)。OnDrawGizmos 方法的定义:
private void OnDrawGizmos()
    {
        Gizmos.DrawWireSphere(transform.position, groundCheckRadius);
    }
意思也就是以 transform.position 为中心画一个半径为 groundCheckRadius 的圆形。接下去将会看到这个方法的作用,现在在 Unity 中的 Player 中修改我们刚刚加入的 Ground Check Radius 变量,可以看到这个绘制的圆。
经过调试,我们发现 OnDrawGizmos() 方法在 Player 整个图形上画了圆,但是我们检测跳跃并不是检测整个角色,而是仅仅检测角色脚下的内容,因此右键 Player,Create Empty 在 Player 下新建一个层,命名为 GroundCheck。
再然后,在脚本中新定义一个 Transform 类型的变量 groundCheck:
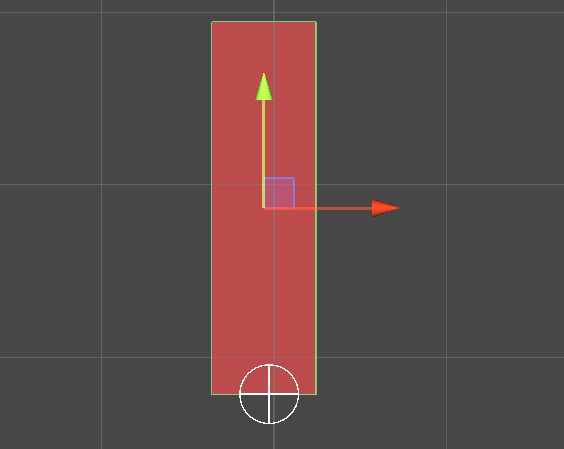
public Transform groundCheck;此时回到 Unity,我们将 Player 移动到与 Platform 接触,查看 Console 会发现一直报错,我们需要将我们刚刚新建的 GroundCheck 拖动到 Player 中(脚本下)的 Ground Check 中。然后我们点击 GroundCheck 选择移动工具,将其移动到角色脚下,并且在 Player 下修改 groundCheckRadius(Ground Check Radius) 的半径到一个合适的大小,如下所示:

接下来,为了表示是否检测到 Player 碰到碰撞体,再新定义一个 bool 变量 groundDetected 来表示:
public bool groundDetected;然后,新定义一个碰撞检测的方法 CollisionChecks() :
private void CollisionChecks()
    {
        groundDetected = Physics2D.OverlapCircle(groundCheck.position, groundCheckRadius);
    }
这里调用了 Physics2D 类下的 OverlapCircle() 方法。这里的意思就是,如果以 groundCheck.position 为中心,groundCheckRadius 为半径的圆中检测到了碰撞体就输出 1,否则就输出 0。
接着在 Update() 方法下调用一下 CollisionChecks() 方法:
CollisionChecks();回到 Unity 中调试,会发现 Player 中的 Ground Detected 在接触到平台后打上 √,也就是这个时候的状态是 1。但是会发现之后如果角色再离开平台,这个 Ground Detected 的状态一直不会改变,这明显不是我们想要的。
于是我们需要创建一个层,新定义一个 LayerMask 类型的变量 whatIsGround:
public LayerMask whatIsGround;在 Physics2D.OverlapCircle() 中加入 whatIsGround:
private void CollisionChecks()
    {
        groundDetected = Physics2D.OverlapCircle(groundCheck.position, groundCheckRadius, whatIsGround);
    }
回到 Unity,找到 Player 脚本中的 What Is Ground 这个项,选择之前命名的 Ground 层。此时进行调试会发现,Player 在 Platform 上会给 Ground Detected 信号,将 Player 从 Platform 上移走,这个 √ 就会消失。
如此整个碰撞体检测就实现了,我们只需要利用 groundDetected 给 Jump() 函数加一个条件语句即可!
private void Jump()
    {
        if (groundDetected)
        {
            rb.velocity = new Vector2(rb.velocity.x, jumpForce);
        }
    }
代码方面,我们可以做的更简洁一些:
首先,我们定义了一堆新的变量,这些变量都出现在 Unity 编辑器中会很乱,所以按照之前一样,可以先隐藏这些变量。另外因为这些变量实现的功能目的是一致的,所以可以将这些变量归为一类,在这些变量定义之前加入一句:
[Header("Collision chect")]这句话的效果如下(第一行的 Collision chect):

整理之后的变量定义:
[Header("Collision chect")]
[SerializeField] private float groundCheckRadius;
[SerializeField] private Transform groundCheck;
[SerializeField] private LayerMask whatIsGround;
private bool groundDetected;
另外的一个小技巧是,变量名的统一修改,一个游戏的变量名是非常庞大的,如果一个一个修改非常耗时且容易出错,此时只要选中这个变量名字,然后 Ctrl + R 可以一键统一修改变量名。比如这里将 groundDetected 改成 isGrounded。
以下便是目前角色动作相关的脚本内容:
using UnityEngine;
public class MoveController : MonoBehaviour
{
private Rigidbody2D rb;
[SerializeField] private float moveSpeed;
[SerializeField] private float jumpForce;
private float xInput;
[Header("Collision chect")]
[SerializeField] private float groundCheckRadius;
[SerializeField] private Transform groundCheck;
[SerializeField] private LayerMask whatIsGround;
private bool isGrounded;
// Start is called before the first frame update
void Start()
{
rb = GetComponent<Rigidbody2D>();
jumpForce = 4;
}
// Update is called once per frame
void Update()
{
CollisionChecks();
xInput = Input.GetAxis("Horizontal");
Movement();
if (Input.GetKeyDown(KeyCode.Space))
{
Jump();
}
}
private void CollisionChecks()
{
isGrounded = Physics2D.OverlapCircle(groundCheck.position, groundCheckRadius, whatIsGround);
}
private void Movement()
{
rb.velocity = new Vector2(xInput * moveSpeed, rb.velocity.y);
}
private void Jump()
{
if (isGrounded)
{
rb.velocity = new Vector2(rb.velocity.x, jumpForce);
}
}
private void OnDrawGizmos()
{
Gizmos.DrawWireSphere(groundCheck.position, groundCheckRadius);
}
}
Section 4: Animation
Move and Idle animation
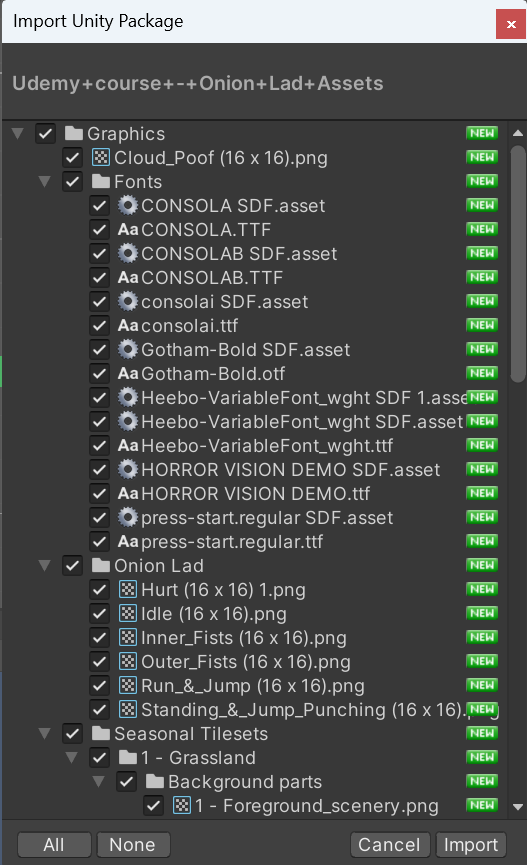
目前为止,我们的角色是一个矩形,我们需要将角色形象化。至此,我们需要导入本套课程给的资源,那资源已经放到了 git 仓库里的 ./resource 目录当中可供下载。里面是一个 Unity package file 类型的文件,可以将其拖入当前的 Unity 工作区,或直接双击打开。此时会弹出一个窗口,其中包含本课程所需的所有内容。如下图所示,会弹出来这样的窗口,选择所有,然后的单击 Import 导入。

Unity 的资源管理器 Project 中进入 Graphics > Onion Lad,里面有已经裁剪好的人物 Hurt,不过一般工作中我们得到的都是像 Idle 这样未裁剪过的资源,接下来先说明如何裁剪人物。
为了更好的演示,首先重置之前的设置,点击资源库中的 Idle,在旁边的 Inspector 中,看到两个人物的图片,旁边有个三点的图标(是第二个),点击 Reset。现在开始,Inspector 中先将 Sprite Mode 中的 Single 改成 Multiple。然后点击 Sprite Editor 进入编辑器(若弹窗,选择 Apply),这里我们可以按单元格大小来切片类型网络,点击左上角的 Slice,Type 改为 Grid By Cell Size,将 Pixel Size 的 X,Y 改为 16, 16(这里有两个角色,也就是两个红框要尽量正好地包括住两个角色),最后点击 Slice 确认,最后点击右上角的 Apply 应用。
点击 Idle 右边的白色箭头会发现其包含了两个角色图片资源,选择其中一个拖入左上角的场景 Scene 中,此时会发现角色特别小,我们到 Project 中点击 Idle,将 Inspector 中的 Pixels Per Unit 改为 16。
现在这个角色(Onion Lad 之后就称为“洋葱小伙”好了)就变大了,但另一个问题是他现在有点模糊,为了解决这个问题,我们要进行压缩,在右边的 Inspector 中的 Default 中的 Compression 里选择 None,然后上面一点的 Filiter Mode 选择 Point(no filiter),点击右下角的 Apply,现在看起来情况就好多了。
设置完了角色,我们先在场景中删除他,然后在 Hierarchy 里点击 Player,我们想将之前课程中创建的这个角色形象改为这个洋葱小伙,于是我们在 Player 的 Inspector 中点击 Sprite Renderer 展开,将 Project 中的洋葱小伙图片拖动到 Sprite 中。此时已经可以看见洋葱小伙了,但因为这个组件应用的是之前的设置,这里的拉伸、颜色等有些错误,我们稍作调整即可。在 Inspector 的 Transform 中的右边有三个点的按钮,点击然后选择 Reset 重置大小,然后颜色改成白色即可(Inspecto -> Sprite Renderer -> Color)。现在这样就好多了!
接着我们设置碰撞体,Inspector 中的 Box Collider 2D 的右边三个点点击,然后选择 Remove Component,删除之前的碰撞体。然后点击最下面的 Add Component 搜索添加 Capsule Collider 2D,将 Edit Collider 旁边的图标点亮,在场景中鼠标手动改大小,将大小正好合适的覆盖洋葱小伙。此时调试我们的游戏,现在我们有了角色可以四处走动了!
但是会发现,此时我们的角色没有动画,下面将简单描述 Animation 这部分。因为篇幅限制,不会在此说明角色的运动动画是怎么做出来的,动画已经制作完放到了本课程的打包资源里。
所以我们现在要做的就是在 Project 资源库中前往 Assets 创建名为 Animation 的文件夹,然后在 Animation 中创建动画控制器(右键 -> Create -> Animator Controller),将其命名为 Player_AC。然后我们点击 Hierarchy 的 Player,将创建的 Player_AC 拖到 Inspector 的最下面,为其创建一个新组件。这个动画控制器允许我们在这个对象上创建动画,查看动画控制器的方法为:左上角Unity 的菜单栏中的 Window -> Animation -> Animator。然后我还需要一个查看动画的 Animation 窗口,打开方法类似:左上角Unity 的菜单栏中的 Window -> Animation -> Animation。接下里点击 Animation 中的 Create 来创建动画,此时会弹出创建文件的窗口,选择刚刚创建的 Animation 文件,将文件命名为:playerIdle。然后到 Project 中的 Assets > Graphics > Onion Lad 下找到 Idle,点开白色圆形箭头,将两个图片拖动到 Animation 窗口中。在 Animation 中播放动画,回到 Scene 场景中,看到洋葱小伙眨眼太快了,这里需要更改 Samples 的值,这里可以先简单理解为播放速度。如果没有看到 Samples 这个值的选项,需要点击蓝色时间轴最右边的三个点,勾选上 Show Sample Rate 即可。这里将 Samples 的值设置为 4。查看 Animator,会看到 playerIdle 默认被设置。
现在通过调试会发现,不管我们做什么动作,角色一直处于空闲状态,于是我们要为其添加其它动画。做法如下:点击 Hierarchy 里的 Player,左下角点击 Animation,再点击 playerIdle 选择 Create New Clip...,在 Assets > Animation 中新建一个动画文件 playerMove。将素材里的 Run & Jump 的两个素材拖入左下角的动画栏中,然后将采样率 Samples 改成 6。目前这只是默认设置,并且我们没有任何类型的玩家移动过渡,我们可以通过在左上角的 Animation 中右键点击 playerIdle 选择 Make Transition 到 playerMove 中,使转换到玩家移动。但这不会起作用,因为我们需要一个条件来知道何时转换玩家移动。于是我们需要创建一个参数:点击左上角的 Parameters 点击加号添加一个参数,类型选择 Bool,取名为 isMoving。点击 Animation 中连接 playerIdle 和 playerMove 状态的箭头,在右边的 Inspector 中的 Condiditions 点击加号,isMoving 选择 true 表示当 isMoving 这个布朗值为 true 时,这个箭头成立,也就是让角色的状态从 playerIdle 到 playerMove。反之从 playerMove 状态到 playerIdle 状态也是一样,右键 playerMove 选择 Make Transition 连接 playerIdle,点击这个箭头,将右侧的 Conditions 下的 isMoving 改成 false。现在让我们关注这个 isMoving 条件参数如何改变,让我们回到 MoveController.cs 这个脚本:
创建一个新的变量 anim:
private Animator anim;与之前的 rb 一样,我们可以在 Start() 方法下获取动画组件:
anim = GetComponent<Animator>();现在我们有了这个动画器的组件,我们可以用它来改变它的参数。首先创建一个布尔值 isMoving:
public bool isMoving;然后在 Update() 这个方法下(注意:第一个参数引号里的这个值必须和前面 Animation 下创建的布尔值名字一模一样):
anim.SetBool("isMoving", isMoving);回到 Unity,运行测试,通过勾选 Inspector 中 Move Controller(Script) 下的 isMoving 参数,会发现角色在两个状态下的变化。不过仔细看会发现,我们勾选 isMoving 参数使角色状态变化是有延迟的,这是由于两个箭头的转变而发生的,我们可以单击箭头,转到设置并检查退出时间,因为我们有 0.25 秒的退出时间和过渡,我们将 Exit Time 取消勾选,点开 Settings,再将 Transition Duration(s) 改成 0 即可。
现在我们需要控制 isMoving 这个布尔值,不是用鼠标在检查器中,而是根据角色的移动。我们可以根据角色的移动速度来进行状态的控制。在 Update() 方法下:
isMoving = rb.velocity.x != 0;也就是当角色的移动等于 rb 的速度,而不是等于 0,那么它就是在移动。
回到 Unity 测试,就会发现角色的状态转换正常了,现在还有一个小问题:我们需要在角色向左移动的时候翻转角色。这个就在后面的章节下完成。本小节的最后,我们来整理一下代码:
isMoving = rb.velocity.x != 0;
anim.SetBool("isMoving", isMoving);
首先提取一下检测状态的代码,对着上述两行代码按下 Alt + Enter 提取方法 Extract method,将其命名为 AnimationControllers()。
然后就是先前创建的 isMoving 变量,实际上我们只在一个函数内部使用它,所以我们删除前面 isMoving 的 public 变量,然 后在AnimationControllers() 方法下创建一个临时变量,该变量仅在函数内部使用。将 AnimationControllers() 改为如下:
private void AnimationControllers()
{
    bool isMoving = rb.velocity.x != 0;
    anim.SetBool("isMoving", isMoving);
}
以上为当前的控制脚本下的所有代码:
using UnityEngine;
public class MoveController : MonoBehaviour
{
private Rigidbody2D rb;
private Animator anim;
[SerializeField] private float moveSpeed;
[SerializeField] private float jumpForce;
private float xInput;
[Header("Collision chect")]
[SerializeField] private float groundCheckRadius;
[SerializeField] private Transform groundCheck;
[SerializeField] private LayerMask whatIsGround;
private bool isGrounded;
// Start is called before the first frame update
void Start()
{
rb = GetComponent<Rigidbody2D>();
anim = GetComponent<Animator>();
jumpForce = 4;
}
// Update is called once per frame
void Update()
{
AnimationControllers();
CollisionChecks();
xInput = Input.GetAxis("Horizontal");
Movement();
if (Input.GetKeyDown(KeyCode.Space))
{
Jump();
}
}
private void AnimationControllers()
{
bool isMoving = rb.velocity.x != 0;
anim.SetBool("isMoving", isMoving);
}
private void CollisionChecks()
{
isGrounded = Physics2D.OverlapCircle(groundCheck.position, groundCheckRadius, whatIsGround);
}
private void Movement()
{
rb.velocity = new Vector2(xInput * moveSpeed, rb.velocity.y);
}
private void Jump()
{
if (isGrounded)
{
rb.velocity = new Vector2(rb.velocity.x, jumpForce);
}
}
private void OnDrawGizmos()
{
Gizmos.DrawWireSphere(groundCheck.position, groundCheckRadius);
}
}
Animations and blend tree
本小节主要讲述混合树(blend tree)相关的概念。
首先我们制作一棵用于跳跃和落下的混合树。这里的跳跃动作素材使用的是 Standing&Jump_Punching (16 x 16) 这个素材,参考前面的方法在 右边的 Sprite Editor 下 Slice 用 Grid by Cell Size 将 Pixel Size 切成 16 × 16。和前面一样,左下角我们在 Assets > Animation 下创建两个新的动画,分别为 playerJump 和 playerFall,然后分别将两个动画素材拖入左下角的时间轴。
点击左上角的 Animator 选中两个新建的 playerJump 和 playerFall,右键 Delete 删除,然后右键空白选择 Create State > From New Blend Tree,这样我们创建了一个混合树,我们将其命名为 Jump/Fall。此时看右上角的 Parameters 参数这里多了一个 Blend,我们将其重命名为 yVelocity。双击 Jump/Fall 我们可以在这个混合树中看到这个参数,我们可以通过左右拉动来改变参数 yVelocity。此时,我们点击右边检查器中的加号两次 Add Motion Field 来创建两个 Motion,然后点击两个新的 Motion 右边圆圈,分别一次选择 playerFall 和 playerJump。然后取消勾选 Automate Thresholds 分别改变 playerFall 的阈值 Threshol 为 -1 和 playerJump 的 Threshol 为 1,这里的意思是 y 轴上的速度是 -1 也就是人物向下落下,然后 y 轴上的速度是 1 也就是人物向上跳跃。我们可以把右下角的 Blend Tree 这一栏拉上来,然后点击开始通过滑动左上角 yVelocity 的值进行测试。
接下来我们需要在代码中控制这个 yVelocity 参数。进入 MoveController.cs 脚本,在 AnimationControllers() 方法下设置 yVelocity 的值即可(这里引号下的词和前面动画器中创建的名字也要一样):
anim.SetFloat("yVelocity", rb.velocity.y);接着我们需要确保只有当角色没有接触地面时,才会进入 Jump/Fall 这个混合树,所以我们在动画器新建一个参数 isGrounded(可以在左边拖动 isGround 参数让其在三个参数的最上面,这也是在参数多的时候一个简单的小技巧)。然后我们用一个箭头连接 playerIdle 和 Jump/Fall 两个状态。为了控制两个状态的转换,我们点击箭头在 Condiditons 下点击加号选择 isGrounded 参数,如果这里有 isMoving 参数可以点击减号删除,我们将 isGrounded 这里的参数设置为 false,意思也就是如果角色没有接触地面这个箭头才生效,也就是 playerIdle 到 Jump/Fall。和前面一样,为了防止动画延迟,我们取消勾选 Has Exit Time,然后将 Transition Duratior 改为 0。然后 Jump/Fall 回到 playerIdle 也同理,在中间加入箭头,然后 Conditions 的参数 isGrounded 为 true,取消退出时间等。然后我们在代码中分配 isGrounded 这个布尔值,也是同理,在 AnimationControllers() 方法中设置(这里引号下的词和前面动画器中创建的名字也要一样):
anim.SetBool("isGrounded", isGrounded);不过这样就有一个问题,通过动画器会看到可以从空闲状态到跳跃,但不能从移动状态到跳跃。因为我们有从空闲到跳跃落下的过渡,但没有从移动到落下的过渡。这里有一个简单的方法来解决:去掉 playerIdle 到 Jump/Fall 的箭头,然后将 Any State 连接 Jump/Fall。然后这个箭头的设置一样,首先 Conditions 将 isGrounded 选择为 false,然后取消勾选 Has Exit Time,然后将 Transition Duratior 改为 0,并且将 Can Transition To Self 取消勾选,这里的意思就是当任何状态下角色没有接触地面就进入 Jump/Fall 这个混合树,而不是仅当角色在空闲状态下且角色没有接触地面才进入跳跃状态。
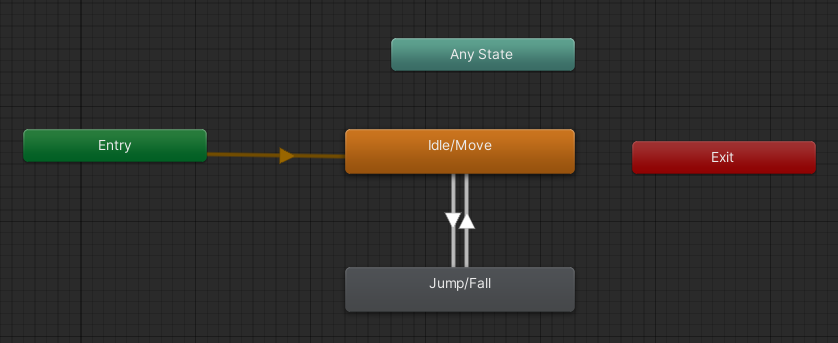
当我们了解了什么是混合树,我们可以将角色的空闲状态和移动状态也整合为一个混合树,以此来简化整个动画器。于是我们首先删除 playerIdle 和 playerMove 两个状态,然后新建一个混合树,将其命名为 Idle/Move,双击这个混合树进入,新建一个参数 xVelocity,然后在右边的检查器中将参数改为 xVelocity。然后在检查器中添加三个 Motion,分别将其添加为 playerMove、playerIdle、playerMove,然后取消勾选 Automate Thresholds,将三个参数分别改为 -1、0、1。在动画器中将 Idle/Move 设置为默认状态右键 Set as Layer Default State。最后将动画器改为下图所示,箭头设置参考前面的方法。

最后需要做的就是在代码中设置 xVelocity 参数即可:
anim.SetFloat("xVelocity", rb.velocity.x);另外由于简化了动画器,我们可以将前面的这两行代码给一并删除了:
bool isMoving = rb.velocity.x != 0;
anim.SetBool("isMoving", isMoving);以上便是混合树的运用。下面是目前移动脚本的全部代码:
using UnityEngine;
public class MoveController : MonoBehaviour
{
private Rigidbody2D rb;
private Animator anim;
[SerializeField] private float moveSpeed;
[SerializeField] private float jumpForce;
private float xInput;
[Header("Collision chect")]
[SerializeField] private float groundCheckRadius;
[SerializeField] private Transform groundCheck;
[SerializeField] private LayerMask whatIsGround;
private bool isGrounded;
// Start is called before the first frame update
void Start()
{
rb = GetComponent<Rigidbody2D>();
anim = GetComponent<Animator>();
jumpForce = 4;
}
// Update is called once per frame
void Update()
{
AnimationControllers();
CollisionChecks();
xInput = Input.GetAxis("Horizontal");
Movement();
if (Input.GetKeyDown(KeyCode.Space))
{
Jump();
}
}
private void AnimationControllers()
{
anim.SetFloat("xVelocity", rb.velocity.x);
anim.SetFloat("yVelocity", rb.velocity.y);
anim.SetBool("isGrounded", isGrounded);
}
private void CollisionChecks()
{
isGrounded = Physics2D.OverlapCircle(groundCheck.position, groundCheckRadius, whatIsGround);
}
private void Movement()
{
rb.velocity = new Vector2(xInput * moveSpeed, rb.velocity.y);
}
private void Jump()
{
if (isGrounded)
{
rb.velocity = new Vector2(rb.velocity.x, jumpForce);
}
}
private void OnDrawGizmos()
{
Gizmos.DrawWireSphere(groundCheck.position, groundCheckRadius);
}
}
Character flip
最后,我们将在移动时翻转我们的角色。因此,当你向左跑时,他也向左。我们要做的就是控制角色向左移动时的旋转。比如现在我们的角色向右看,此时他的 Rotation 的 Y 为 0,也就是他在 y 轴上的旋转为 0,当我们将其改为 180,就会发现角色向左了。这就是我们需要在代码中做的事情。
我们在代码中创建一个布尔值 facingRight (默认情况下角色将朝右):
private bool facingRight = true;然后我们写一个翻转方法,就是当执行这个方法时 facingRight 这个布尔值不等于它自己也就是相反,然后旋转角色进行翻转:
private void Flip()
    {
        facingRight = !facingRight;
        transform.Rotate(0, 180, 0);
    }
然后我们创建一个新方法 FlipController() 调用 Flip() 方法即可,具体实现为当角色向左移动时,其 x 轴上的速度为负数,然后此时如果 facingRight 也为 true 也就是此时角色朝右,我们就进行翻转,向右时反之:
private void FlipController()
    {
        if (rb.velocity.x < 0 && facingRight)
        {
            Flip();
        }
        else if (rb.velocity.x > 0 && !facingRight)
        {
            Flip();
        }
    }
最后我们在 Update() 方法中调用 FlipController() 方法即可:
FlipController();以上便是翻转角色所需要的全部内容。下面是本次课程中角色移动脚本的完整代码:
using UnityEngine;
public class MoveController : MonoBehaviour
{
private Rigidbody2D rb;
private Animator anim;
[SerializeField] private float moveSpeed;
[SerializeField] private float jumpForce;
private float xInput;
[Header("Collision chect")]
[SerializeField] private float groundCheckRadius;
[SerializeField] private Transform groundCheck;
[SerializeField] private LayerMask whatIsGround;
private bool isGrounded;
private bool facingRight = true;
// Start is called before the first frame update
void Start()
{
rb = GetComponent<Rigidbody2D>();
anim = GetComponent<Animator>();
jumpForce = 4;
}
// Update is called once per frame
void Update()
{
AnimationControllers();
CollisionChecks();
FlipController();
xInput = Input.GetAxis("Horizontal");
Movement();
if (Input.GetKeyDown(KeyCode.Space))
{
Jump();
}
}
private void AnimationControllers()
{
anim.SetFloat("xVelocity", rb.velocity.x);
anim.SetFloat("yVelocity", rb.velocity.y);
anim.SetBool("isGrounded", isGrounded);
}
private void Movement()
{
rb.velocity = new Vector2(xInput * moveSpeed, rb.velocity.y);
}
private void Jump()
{
if (isGrounded)
{
rb.velocity = new Vector2(rb.velocity.x, jumpForce);
}
}
private void Flip()
{
facingRight = !facingRight; // works as a switcher
transform.Rotate(0, 180, 0);
}
private void FlipController()
{
if (rb.velocity.x < 0 && facingRight)
{
Flip();
}
else if (rb.velocity.x > 0 && !facingRight)
{
Flip();
}
}
private void CollisionChecks()
{
isGrounded = Physics2D.OverlapCircle(groundCheck.position, groundCheckRadius, whatIsGround);
}
private void OnDrawGizmos()
{
Gizmos.DrawWireSphere(groundCheck.position, groundCheckRadius);
}
}
Section 5: Not the end
What is next?
仓库中 ./Onion Lad 下的 Udemy course - Onion Lad.exe 文件可以在 64 位的 Windows 系统下运行本次课程的导出内容供参考。
以上便是对 Unity 引擎和 C# 语言的初见,相信有了本节课程,对在 Unity 环境开发应该有了一个整体的感受,明白了 Unity 引擎的特色以此来判断是否合适自己的开发。那么接下里我觉得就可以入手一些简单的项目了!


Your blog has become an indispensable resource for me. I’m always excited to see what new insights you have to offer. Thank you for consistently delivering top-notch content!
Hello i think that i saw you visited my weblog so i came to Return the favore Im trying to find things to improve my web siteI suppose its ok to use some of your ideas